post

12 Essential Ways to Protect Your Dog From Ticks This Summer

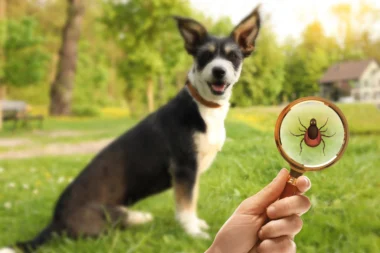
Summer brings longer days, warmer temperatures, and countless opportunities to enjoy the outdoors with your dog. From hiking scenic trails to spending afternoons at the park, the season is perfect for adventure. However, summer also marks the peak of tick activity, making it one of the most important times of the year to focus on your dog’s health and safety.

Ticks may be small, but they can pose a significant threat to dogs. These parasites feed on blood and can transmit a variety of diseases that may lead to serious health complications. Many dog owners don’t realize how easily a tick can attach during a simple walk through a grassy area. Fortunately, a few preventive habits can dramatically reduce the risk.

If you want your dog to enjoy the summer safely, these 12 essential tips will help you stay one step ahead of ticks all season long.

Why Tick Prevention Matters

Ticks are found in forests, fields, parks, gardens, and even residential neighborhoods. They wait on grass blades, shrubs, and low vegetation until a suitable host passes by. Once attached, they can remain unnoticed for days while feeding.

Some tick-borne diseases can affect a dog’s joints, nervous system, immune system, and overall well-being. Symptoms may not appear immediately, which makes prevention especially important. Protecting your dog from tick bites is often far easier than treating a disease after infection occurs.

1. Use a Trusted Tick Prevention Product

The foundation of tick protection starts with a reliable preventive treatment. Modern veterinary medicine offers several highly effective options designed to kill or repel ticks before they can cause harm.

Many dog owners choose monthly chewable tablets because they are convenient and provide consistent protection. Others prefer topical treatments that are applied directly to the skin or long-lasting collars designed to repel parasites over several months.

The best option depends on your dog’s age, size, health condition, and lifestyle. Dogs that frequently hike or spend significant time outdoors may require different protection than dogs that primarily stay in urban environments. Speaking with your veterinarian can help you choose the most appropriate solution for your pet’s specific needs.

Consistency is crucial. Missing treatments can leave gaps in protection and increase your dog’s risk during peak tick season.

2. Check Your Dog After Every Walk

One of the simplest and most effective habits is performing a quick tick check whenever your dog returns home from outdoor activities.

Ticks often crawl around the body before attaching, so finding them early can prevent problems before they start. Make a routine of running your hands through your dog’s coat while paying attention to areas where ticks commonly hide.

The ears, neck, chest, armpits, groin area, and spaces between the toes are particularly attractive locations for ticks. Dogs with long or thick fur may require a more careful inspection because ticks can remain hidden beneath the coat.

Daily checks only take a few minutes but can make a significant difference in reducing disease risk.

3. Keep Your Yard Well Maintained

Many people assume ticks are only found deep in the woods, but they can also thrive in residential yards. A poorly maintained lawn provides the perfect environment for ticks to survive and reproduce.

Regular mowing helps reduce the humid conditions that ticks prefer. Removing leaf piles, trimming overgrown shrubs, and clearing brush can also make your property less attractive to ticks and the wildlife that often carries them.

Creating a clean and open outdoor space not only improves the appearance of your yard but also reduces the likelihood of your dog encountering ticks close to home.

4. Stay on Clear Trails During Outdoor Adventures

Exploring nature is one of the joys of summer, but some areas present a higher risk than others.

Ticks are commonly found in tall grass, dense vegetation, and wooded environments where they can easily attach to passing animals. When hiking or walking, it is generally safer to stay on well-maintained paths rather than allowing your dog to roam through thick brush or overgrown fields.

Choosing clear trails doesn’t mean limiting your adventures. It simply reduces unnecessary exposure while still allowing your dog to enjoy the outdoors.

5. Consider Additional Protective Gear

For dogs that spend a lot of time outdoors, extra protective gear can provide another layer of defense against ticks. While these products should never replace veterinarian-approved prevention methods, they can complement an existing protection plan.

Tick-repellent bandanas and specially designed outdoor vests have become increasingly popular among active dog owners. Some products are treated with ingredients intended to discourage ticks from attaching during hikes or camping trips.

In certain situations, lightweight protective clothing may also help reduce skin exposure, particularly in heavily wooded regions. Dog-safe tick-repellent sprays can offer short-term protection during outdoor activities, provided they are used according to the manufacturer’s instructions.

When combined with regular tick prevention and routine inspections, these additional measures can help reduce overall risk.

6. Groom Your Dog Regularly

Regular grooming offers benefits far beyond keeping your dog looking great. It also creates valuable opportunities to detect ticks early.

Brushing your dog’s coat allows you to inspect the skin more closely and identify anything unusual before it becomes a larger issue. Long-haired breeds especially benefit from frequent grooming because parasites can easily hide beneath thick fur.

Professional grooming appointments can also provide another set of trained eyes that may notice ticks or skin irritation that owners might overlook.

A well-maintained coat makes tick detection easier and helps support your dog’s overall health.

7. Bathe Your Dog After Outdoor Activities

A bath can help remove dirt, debris, and occasionally unattached ticks that may be hiding within the coat.

While bathing alone will not eliminate all tick risks, it provides another opportunity to carefully inspect your dog’s skin. Dogs that frequently swim, hike, or play in grassy environments may particularly benefit from regular bathing during the summer months.

Using dog-friendly shampoos and maintaining a consistent grooming routine can help keep the coat clean and make future tick checks more effective.

8. Learn How to Remove Ticks Properly

Even with excellent prevention, a tick may occasionally attach to your dog. Knowing how to remove it safely is an important skill for every pet owner.

Using fine-tipped tweezers or a specialized tick removal tool, grasp the tick as close to the skin as possible and pull upward with steady pressure. Avoid twisting or crushing the tick during removal, as this may increase the risk of irritation.

After removal, clean the area thoroughly and monitor your dog for any signs of redness, swelling, or unusual behavior over the following days.

Proper removal can significantly reduce the chance of complications.

9. Protect Yourself as Well

Tick prevention should not focus solely on your dog. Humans can also be exposed to ticks during outdoor activities.

When walking in wooded or grassy areas, wearing long sleeves, long pants, and appropriate footwear can help reduce your own exposure. Performing tick checks on yourself after spending time outdoors is equally important.

Protecting both yourself and your pet creates a safer environment for everyone involved.

10. Watch for Signs of Tick-Borne Illness

Despite preventive efforts, it is still important to remain alert for symptoms that could indicate a tick-related illness.

Changes in energy levels, appetite loss, limping, stiffness, fever, or unusual behavior should never be ignored. Some diseases may develop gradually, making early recognition especially valuable.

If you notice concerning symptoms, contact your veterinarian promptly. Early diagnosis often leads to better treatment outcomes and a quicker recovery.

11. Keep Wildlife Away From Your Property

Wild animals play a major role in spreading ticks. Deer, rodents, rabbits, and other wildlife frequently carry ticks into residential areas.

Reducing attractants around your property can help limit visits from these animals. Securing trash bins, removing food sources, and maintaining fencing may reduce wildlife activity near areas where your dog spends time.

The fewer tick-carrying animals that visit your yard, the lower the overall risk for your pet.

12. Schedule Regular Veterinary Checkups

Routine veterinary visits remain one of the most effective ways to support your dog’s long-term health.

Your veterinarian can recommend prevention strategies based on local tick populations, evaluate your dog’s overall condition, and address any concerns before they become serious problems.

Annual or seasonal checkups provide an opportunity to discuss changes in tick activity, review preventive medications, and ensure your dog remains fully protected throughout the year.

Final Thoughts

Summer should be a season of fun, exploration, and unforgettable adventures with your dog—not a season of worrying about ticks.

By combining preventive treatments, regular inspections, proper grooming, smart outdoor habits, and routine veterinary care, you can dramatically reduce your dog’s risk of tick exposure. No single method provides perfect protection on its own, but together these strategies create a strong defense against one of summer’s most common threats.

A few extra minutes of prevention today can help keep your dog healthy, comfortable, and ready for every adventure that summer has to offer.

post

15 Spring Nail Designs You’ll Want to Copy This Season

Spring is finally here, and that means it’s time to trade dark winter nails for soft colors, floral details, and glossy finishes. Whether you love minimalist manicures or bold Pinterest-inspired nail art, these spring nail designs are perfect for your next salon visit.

1. Pastel French Tips

Soft pastel French tips are one of the biggest spring nail trends this year. Instead of classic white tips, choose baby blue, lavender, mint green, or peach shades for a fresh seasonal look.

https://images.openai.com/static-rsc-4/EGfbkJJrT2EPJNc5oP4V3xm5IOAlGzMCeWdEjNxUljBn-5_1dP0JfEsfD-OYSPkYcVodEoF_FF2CtJdRkc61NYLis5dHzMbrmiyO_i3iOz15Qj6IwIqta1WJT9oELpsc2JLVV6-HpBSQ1X8R57q-RZDE85VKA_2s4w-fsW4mS1SsStex-cUsso48Z4pghLFW?purpose=fullsize

This manicure feels elegant, clean, and playful at the same time — perfect for everyday spring outfits.

2. Daisy Flower Nails

Tiny white daisies instantly make any manicure look cheerful and feminine. This design works beautifully on nude or sheer pink bases.

https://images.openai.com/static-rsc-4/Jh_IArnwthmKV8qCzpyN_1LjVcHb2pai1MAMHI_DZcARoI_9cuD48H1788Yd8EzMA3Fiansqk7xM7v9mqDglwXTvn69zaCJQwt9G84AFZg0syGh2QSWpLV3c9GJYHehKHUeedKc0HLwo8srdRlt4Y6epTskkHffsRy4aWyJeSleZp4D_ku49PypDkrwb9Hfu?purpose=fullsize

Daisy nails are perfect if you want something soft, cute, and very Pinterest-worthy.

3. Strawberry Milk Nails

Strawberry milk nails are glossy, soft pink, and super clean-looking. This trend became viral because it gives nails a healthy and luxurious appearance.

https://images.openai.com/static-rsc-4/qtmsvuxj01nXKKSgvHJF64AKE5zbnKKqBgQ8MtilzD1-bjx4wXaGIMK5aqrJg5Vejdu9uIazJ8g9xUdXVwkvAqYMq9i1TvqOnn4_-l9zs16b-fRLoGGfyJfCvN03wbpBu-CX6wqndxlvtN8Fd4EPAba2ifrCclyritD42-Gr22ZHQ81fMMKC_aFUA7UnjEI-?purpose=fullsize

If you love minimalist beauty trends, this manicure is a must-try for spring.

4. Lavender Chrome Nails

Lavender chrome nails combine soft pastel colors with reflective shine. The result looks dreamy, modern, and incredibly stylish.

https://images.openai.com/static-rsc-4/xdXrB1I_uArEc3Armk7QwnxDIMDO8aeN21-W0iibfBZJ54m9XTKV6gf5IdyUvVVCKTBw5PCCTFIY49lSwNJ2Ho_Uvuml38e2irVKCGAKk_1k3T7cUi0DvrOjHjxJaCAT-2exfM-f_msvRdgRBNf9n33htQP7gOKZPjP4ptS5sIxI5mOoDHQZB74yjOSVlbOP?purpose=fullsize
https://images.openai.com/static-rsc-4/0WxMveZF6lyq03N-8fVAMa3GDULW9TgEIz5FVV5oImONIOswZPcfWnDq54X1fbMxW2QM4Q6mDjY25xsBVU2oqlqLBe7XuyykpIipXpKD2cKfs8eDulf-tlcBer6w29iIpoWLrgXd4sHMq5nF5CXM6lkVATE1uu3zi1aNS-HRbT8JPmS0PC9sWva4PzfUbW3R?purpose=fullsize

Chrome finishes catch the light beautifully and instantly elevate any manicure.

5. Floral Accent Nails

Floral accent nails are perfect if you want subtle spring nail art without covering every nail in flowers.

https://images.openai.com/static-rsc-4/nPLHq0ZggwTO8KoPN_WMWmDZ1NZ4q63E497ohwT48CUMbAPx1WstxR7Gg5hEw2Bq25yHOOi3jqzhs5Dv4qwfhBNJvoN9aW9C8_w7K_gLQ9fG7BiAEXYkkL0oNvyf4GrX3B3hgws0cbFFl5ortXNX40R7SoZ6ZmUDfgutQB8e7W_bmTlF0995j9YP3eeDVyEt?purpose=fullsize

A few delicate flowers on neutral nails create a classy and romantic spring look.

6. Mint Green Nails

Mint green is one of the freshest spring nail colors. It feels playful, clean, and surprisingly easy to wear.

https://images.openai.com/static-rsc-4/9yWuvHyz8t0pnxf_aBnsUVl3ZjOR5AqA92yJrKHMnG1o80u9W7fOTQGuuPKd2gNnbcrvIkbQ5vrzR9p_ZL8__lOz6HXQz5-nfT20ZDBGb7XEY-T45jFZD6ABBuTGNdHfAJ7y5DsmcpZf7mKfcuiFVhU8c3SvmUvOH3qri0G7QHE4oisDUVf45CViAZ95xbPN?purpose=fullsize

This shade looks especially beautiful in natural sunlight during spring days.

7. Butterfly Nail Art

Butterfly nails bring soft Y2K energy back into spring beauty trends. Tiny butterfly details make any manicure feel magical.

https://images.openai.com/static-rsc-4/fN9r9tz9blYnW6VrpFMeyxnuqYJ3kPH195BcHJejG4ICmRhrPZthKLzLWBJBWbAT3HdHfPKoB-z1C36QpB9gKVY0ahAqeZ8RqpItVUHGoZLnhaj7euydlT9bXnxtJGnZjinaiZ-I44bpqK1CNZasBGUo6nxakNz4fV-ytqEA-ybVdgeBbA2rOfQU7w1kIR7Q?purpose=fullsize

Pair butterfly designs with pastel shades for the ultimate dreamy manicure.

8. Peach Ombre Nails

Peach ombre nails blend warm orange and pink tones together for a soft sunset-inspired look.

This manicure feels warm, feminine, and perfect for vacations or sunny weather.

9. Tiny Tulip Nails

Tulip-inspired nail art is one of the cutest floral trends for spring. Tiny tulips add a playful but elegant touch.

https://images.openai.com/static-rsc-4/bGBR8fuqhsAdbUuaGxraFFXWNf1oy5BgHtQsLzZ1lM-nFfJQUWkCp30x8h2rDUCC4edE02Sf-fCEDZ5lyA2r2L_mXuIR9Y2W9UnSUg5vgpxOc0_RbJnF1GsVHdXl_iXoPUMKZ1dP8DbBTxlY2LMcsrRUfQXBslErWG_WkMlzXMhCCwyQJTbYtk7LgmOSBhvt?purpose=fullsize

Tulip nails are ideal for anyone who loves soft floral aesthetics.

10. Sky Blue Nails

Sky blue nails instantly remind us of bright spring mornings and clear skies.

https://images.openai.com/static-rsc-4/hpfzXCbNBoCeUkylHoOadR0oYByXV-gy_F6kQhzM8OPlfPLsSZC8yiX7xch2Dy6iUDNMBZgAmZ6xMOWsSb7b9kqwTZr0ltfp1J2R9iiknSP507lsm6OZNyxs6Hcq3JdCM1yWZm0cMImKLbhWlh5WoCnLeRcQ00fnKJfCVvgTz-PGqHELAtwD_SEwMX0mWcZV?purpose=fullsize

This fresh shade works beautifully with silver jewelry and clean minimalist outfits.

11. Lemon Yellow Nails

Soft lemon yellow nails are cheerful, bright, and perfect for spring sunshine.

https://images.openai.com/static-rsc-4/ZgaQE103TEijwHof-B59BKIZD1B63W5U2Tii__cQnaisBYCQPIEnWEVhFpNKxrJdze24e78rSlierQ1E9QsX2FLkugSUd5syQ2Yc_YlSfOEmmfvfcVcvHNOys7k3CsU0nNHb7iLl6cnDoItm1U9oAbbvMamN24MNKkMKWNBSZs3wAeFmUDFJUSpq3ZAMm0iQ?purpose=fullsize
https://images.openai.com/static-rsc-4/rv6Cs1vXGIihhb8BVezhmBuXTWVjEC5imEGsCVRRlUhneqzV5-Dbnwo18jcW2fBa54_SFCiS5o7EejA9h1utqGuuwCb_opUucYvvGq9HSJE4Fm2was0oEqNF0xy3OR-Uxr9oJk6C-wbk1CycsaTR72wOJDUCSvuyYg6pHzld-E29N42ttkf_f8yHNQGeVTZy?purpose=fullsize

If you want a manicure that instantly boosts your mood, yellow nails are a perfect choice.

12. Pearl Nails

Pearl nails combine glossy finishes with elegant pearl details for a soft luxury look.

https://images.openai.com/static-rsc-4/k9-2nv7ag1Db5NSI5-76pxzWlQfHFTVIic88RNbf-1acOAsnQp1XnfKiqKkAt5-iFo1pSPbrFvqY9rOWHSgXia3z3W5-p-Dyei6MX29l9M8DbeEx6aufpY0cQ_v_XNNAQJmgfKOAp6UIoCPmgPHyc89tXpePLTSzdvxyNsnZFjumLlyNLiKrm4l7UvygtcVy?purpose=fullsize

They’re especially popular for weddings, spring events, and classy feminine aesthetics.

13. Rainbow Pastel Nails

Can’t choose just one spring color? Rainbow pastel nails let you wear all your favorites at once.

https://images.openai.com/static-rsc-4/lkrnytWFVLyhduM_oi0_exO8Hv5lhI4ttkRw6i-Y1c60eaj1kZd4nyXlGmJq0UOO0qvC8Csb1Hz9x3iqUCssahXdJUCuKgko8qg0pIGBlNxUgT79pARzN8T2wg2Djl6xoOCVMdXlHNPUG2b5yAsCX36JFW94hHFPowiJs_rN14HP1Gi1aSGwoqVg5Pg0tWHN?purpose=fullsize

This fun manicure feels playful, trendy, and super Instagram-worthy.

14. Cherry Blossom Nails

Cherry blossom nails perfectly capture the beauty of spring with delicate pink flowers and soft nude tones.

This design feels romantic, elegant, and timeless.

15. Pink Glazed Donut Nails

Pink glazed donut nails continue dominating beauty trends thanks to their glossy and luxurious finish.

https://images.openai.com/static-rsc-4/Y8ML_xC3VFWXqyfaP69RXXkm0SqVuklKDbjBBRU93aOPaH-1hRakZe065YNkLYCSlwlieMZO8zyA6Eld0mtjqDIYEpkuYpa1JAwNftyMnnVBPRS0nn1ODLt-tnuhBDXDp5fmQ9d1U6HNVm3i67TN2Ywj5d20NYghxA9Nok7YXCCv6xZtaWmRBD3NlkdtvQ0b?purpose=fullsize

The shiny glazed effect makes nails look healthy, expensive, and effortlessly stylish.

Final Thoughts

Spring is the perfect season to experiment with soft colors, floral details, glossy textures, and playful nail art. Whether you prefer minimalist styles or bold statement nails, these trendy spring nail ideas are guaranteed to inspire your next manicure.

post

The Tick Mistake Almost Everyone Makes in Summer (And How to Protect Yourself Naturally)

Every summer, millions of people spend more time outdoors:
walking trails, gardening, hiking, camping, relaxing in parks, or simply enjoying warm evenings outside.

But there’s one tiny danger many people underestimate until it’s too late.

Ticks.

And the scary part?

Most people unknowingly make the exact same mistakes that increase the chance of bringing ticks home, getting bitten, or exposing their pets and family members.

Today, ticks are more common than ever —
and they’re no longer only found deep in forests.

Many people encounter ticks:

  • in their backyard
  • at local parks
  • near sidewalks
  • around tall grass
  • near bushes and fences
  • even close to urban neighborhoods

If you spend time outside during summer, this is something you should absolutely know.

Why Tick Season Feels Worse Every Year

Ticks thrive in:

  • warm temperatures
  • humidity
  • shaded environments
  • overgrown vegetation
  • moist outdoor areas

And during warmer summers, tick populations can increase dramatically.

Many people are surprised to learn that ticks don’t just disappear after spring.

In many areas, tick activity stays high throughout:

  • summer
  • early fall
  • humid late-season weather

That means outdoor exposure can happen for months.

The Biggest Tick Mistake People Make

Most people think ticks fall from trees.

They don’t.

Ticks usually wait in:

  • grass
  • brush
  • weeds
  • low vegetation

Then they attach themselves to:

  • shoes
  • socks
  • legs
  • pets
  • clothing

The most common mistake?

Not checking immediately after being outdoors.

Many people:

  • wait until nighttime
  • forget completely
  • only do a quick glance
  • assume short outdoor trips are safe

But even a few minutes in the wrong area can be enough.

The sooner you find a tick, the better.

Where Ticks Usually Hide

Ticks love warm and hidden places on the body.

Always check carefully:

  • behind the knees
  • under the arms
  • around the waist
  • inside the belly button
  • behind the ears
  • along the hairline
  • between the legs
  • around socks and ankles

Parents should also check children carefully after outdoor activities.

Ticks on children are often missed in the scalp or behind the ears.

Why Some People Seem To Get More Tick Bites

Many people notice that one person in the group gets bitten more often than everyone else.

There are several possible reasons:

  • body heat
  • sweat
  • outdoor clothing
  • walking closer to vegetation
  • spending more time in humid areas

Dark clothing can also make ticks harder to spot quickly.

That’s why many hikers wear:

  • light-colored socks
  • light pants
  • long sleeves

The Backyard Habits That Attract Ticks

Many homeowners unknowingly create the perfect environment for ticks.

Ticks love:

  • tall grass
  • damp areas
  • leaf piles
  • overgrown bushes
  • cluttered yard edges
  • shaded corners

Even small backyard issues can increase tick activity.

How To Get Rid Of Ticks Around Your Yard

If you want to reduce ticks naturally around your property, consistency matters.

Simple habits can make a huge difference.

Keep Grass Short

Tall grass is one of the biggest tick hotspots.

Mow regularly and trim:

  • weeds
  • fence lines
  • garden edges
  • areas near patios
  • shaded walkways

Dry sunny spaces are much less attractive to ticks.

Remove Leaf Piles and Debris

Ticks thrive in moist hiding spots.

To help get rid of ticks naturally:

  • clear leaves regularly
  • remove brush piles
  • trim dense shrubs
  • avoid clutter near the home

A cleaner yard can dramatically reduce tick activity.

Create Dry Barriers

Some homeowners use:

  • gravel
  • mulch
  • wood chips

between lawns and wooded areas.

Ticks prefer moisture and often avoid dry open barriers.

Reduce Wildlife Visitors

Ticks are commonly carried by:

  • deer
  • mice
  • stray animals
  • outdoor pets

To reduce tick exposure:

  • secure trash
  • avoid leaving pet food outside
  • reduce hiding areas for rodents

The fewer animals entering the yard, the fewer ticks you’re likely to encounter.

Natural Ways To Help Keep Ticks Away

Many people prefer natural prevention methods during summer.

Popular natural scents often used around outdoor spaces include:

  • cedarwood
  • eucalyptus
  • peppermint
  • lavender
  • lemon eucalyptus

These are commonly used around:

  • shoes
  • socks
  • patios
  • outdoor furniture
  • garden seating areas

Light-colored clothing can also help you spot ticks faster.

The Clothing Trick Experienced Hikers Use

Experienced hikers often use one surprisingly simple trick:

They tuck pants into socks.

It may not look fashionable —
but it helps prevent ticks from reaching exposed skin unnoticed.

Long sleeves and closed shoes can also reduce exposure significantly.

Tick Mistakes People Make After Coming Indoors

One of the biggest mistakes happens after people return home.

Many people:

  • sit on beds immediately
  • leave outdoor clothes on the floor
  • forget to shower
  • skip checking pets

Instead:

  • change clothes quickly
  • inspect exposed skin
  • shower if possible
  • wash outdoor clothing
  • check shoes and socks carefully

These small habits can reduce the risk dramatically.

Don’t Forget About Pets

Dogs and outdoor cats can easily carry ticks into the house.

Always inspect:

  • ears
  • collars
  • paws
  • belly
  • neck

Pet bedding should also be cleaned regularly during peak tick season.

Can Ticks Live Inside Homes?

Ticks prefer outdoor environments —
but they absolutely can survive indoors for a period of time.

Especially if they arrive on:

  • pets
  • clothing
  • backpacks
  • blankets
  • shoes

That’s why quick checking matters so much.

Tick Removal Mistakes To Avoid

If you find a tick attached to the skin:

  • use fine-tipped tweezers
  • grab close to the skin
  • pull upward slowly and steadily

Avoid:

  • burning the tick
  • twisting aggressively
  • crushing it
  • covering it in chemicals first

After removal:

  • clean the area
  • wash your hands
  • monitor the skin

Symptoms People Sometimes Ignore

Many people never notice the bite itself.

That’s why it’s important to pay attention to unusual symptoms after outdoor exposure.

Possible warning signs may include:

  • unusual fatigue
  • headaches
  • fever
  • muscle aches
  • skin redness
  • flu-like feelings

If symptoms appear after a tick bite, contact a medical professional.

Why Tick Prevention Matters More Than Ever

Many people only think about ticks after finding one attached.

But prevention is much easier than dealing with the problem later.

The best long-term strategy is:

  • regular yard maintenance
  • quick body checks
  • protecting exposed skin
  • checking pets often
  • avoiding tall grass
  • staying consistent

Small habits repeated regularly can dramatically reduce your exposure.

Final Thoughts

Ticks may be tiny —
but ignoring them can become a very big mistake.

The good news?

Simple prevention habits can make a huge difference:

  • checking immediately after outdoor activities
  • maintaining your yard
  • reducing moisture and overgrowth
  • protecting pets
  • using smart outdoor habits

Most people don’t think about ticks until they find one.

The smarter approach is preventing the problem before it starts.

post

How to Get Rid of Drain Flies in Sink (Complete Guide)

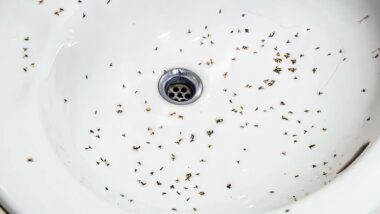
Drain flies are one of the most annoying household pests. They are tiny, fuzzy, moth-like insects that seem to appear out of nowhere and hover around your sink, shower, or drain. While they are not dangerous, they are a clear sign that something in your plumbing needs attention.

If you are dealing with drain flies, the good news is that you can get rid of them completely with the right approach. This guide will walk you through everything you need to know — from identifying the problem to eliminating it for good.

What Are Drain Flies?

Drain flies (also known as sink flies, sewer flies, or moth flies) thrive in moist environments rich in organic material. They lay their eggs in the slimy buildup inside drains, where larvae can feed and grow.

You will usually notice:

  • Small gray or brown flies resting near your sink
  • Slow, fluttering movement (they are not strong flyers)
  • Increased activity around drains, especially at night

The real issue is not the flies themselves — it is the organic sludge inside your pipes.

Why Do Drain Flies Appear?

Drain flies are attracted to:

  • Food residue in kitchen drains
  • Soap scum in bathroom sinks and showers
  • Hair and grease buildup
  • Standing water or rarely used drains

If your sink is not cleaned regularly or if there is hidden buildup inside the pipes, it creates the perfect breeding ground.

Step-by-Step: How to Get Rid of Drain Flies

1. Confirm the Source

Before you start cleaning, make sure the drain is actually the source.

A simple test:

  • Place a piece of clear tape over the drain overnight (sticky side down, but not sealing it completely)
  • If flies stick to it by morning, you have found the breeding site

2. Clean the Drain Thoroughly

This is the most important step.

You need to remove the slimy organic layer where larvae live.

Method: Mechanical cleaning (best option)

  • Use a drain brush or pipe cleaning brush
  • Scrub the inside of the drain and pipe walls
  • Focus on removing visible sludge

Hot water alone is NOT enough — you must physically remove buildup.

3. Use Boiling Water

After scrubbing:

  • Pour boiling water down the drain
  • Repeat 1–2 times daily for several days

This helps flush out remaining debris and larvae.

4. Apply Natural Cleaning Solutions

You can use safe household solutions to break down residue.

Option A: Baking soda + vinegar

  • Pour 1/2 cup baking soda into the drain
  • Add 1 cup vinegar
  • Let it fizz for 15–30 minutes
  • Flush with hot water

Option B: Salt + baking soda + vinegar

  • 1/2 cup salt
  • 1/2 cup baking soda
  • 1 cup vinegar
  • Leave overnight, rinse in the morning

These methods help dissolve organic matter and kill larvae.

5. Use Enzyme Cleaners (Highly Effective)

For deeper cleaning, enzyme-based drain cleaners are one of the best solutions.

They:

  • Break down organic sludge
  • Eliminate breeding material
  • Prevent future infestations

Use them according to instructions for several days in a row.

6. Trap Adult Flies

While cleaning the drain removes the source, you should also eliminate existing flies.

Simple trap:

  • Fill a bowl with apple cider vinegar
  • Add a drop of dish soap
  • Place it near the sink

The vinegar attracts flies and the soap breaks surface tension, trapping them.

7. Repeat for Several Days

Drain fly life cycle is about 7–14 days.

This means:

  • You must continue treatment for at least a week
  • Otherwise, newly hatched flies will bring the problem back

Consistency is key.

How to Prevent Drain Flies in the Future

Once you get rid of them, prevention is simple but important.

Keep drains clean

Regularly flush drains with hot water and clean them weekly.

Avoid buildup

Do not let grease, food, or hair accumulate in the drain.

Use drain covers

They help catch debris before it enters the pipes.

Run water in unused drains

If a drain is rarely used, run water occasionally to prevent stagnation.

Monthly maintenance

Use baking soda and vinegar or enzyme cleaner once a month.

When the Problem Persists

If drain flies keep coming back, the issue may be deeper.

Possible causes:

  • Buildup deep in pipes
  • Hidden leaks
  • Biofilm in plumbing system
  • Issues in sewer line

In such cases, professional drain cleaning may be necessary.

Final Thoughts

Drain flies are not just a nuisance — they are a warning sign. If you see them, your drain likely contains organic buildup that needs to be removed.

The fastest and most effective solution is:

  1. Physically clean the drain
  2. Use boiling water and natural cleaners
  3. Maintain regular hygiene

With consistent effort, you can eliminate drain flies completely and keep your sink clean and fresh long-term.

post

How to Get Rid of Silverfish Naturally (Fast & Easy Methods That Work)

Silverfish are one of those annoying little pests that seem to appear out of nowhere. They move fast they hide well and they love the same environments we do warm humid and full of organic materials. The good news is you do not need harsh chemicals to get rid of them. There are simple natural methods that work quickly and effectively if you apply them correctly.

In this guide you will learn exactly how to eliminate silverfish using safe natural solutions and how to make sure they do not come back.

What Are Silverfish and Why Are They in Your Home

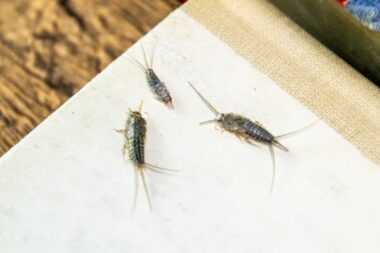
Silverfish are small wingless insects with a shiny silver appearance and a fish-like movement. They thrive in dark damp places such as bathrooms kitchens basements and behind walls.

They are attracted to:

  • Moisture and humidity
  • Paper cardboard books and wallpaper glue
  • Food crumbs and sugars
  • Fabrics like cotton and linen

If you are seeing silverfish it is usually a sign that your home has excess moisture or hidden food sources.

Step 1: Reduce Humidity (The Most Important Step)

Silverfish cannot survive long in dry environments. This makes humidity control the fastest and most effective solution.

What to do:

  • Use a dehumidifier especially in bathrooms or basements
  • Open windows regularly to improve airflow
  • Fix leaking pipes or condensation issues
  • Turn on exhaust fans when cooking or showering

Even a small drop in humidity can dramatically reduce silverfish activity.

Step 2: Clean and Remove Their Food Sources

Silverfish feed on tiny particles so even a clean home can still support them if small residues are present.

Focus on:

  • Vacuuming carpets corners and baseboards regularly
  • Wiping shelves and removing dust buildup
  • Storing dry food in sealed containers
  • Keeping books and papers in dry areas

Pay special attention to hidden spots like under furniture and inside cabinets.

Step 3: Natural Repellents That Work Fast

Certain natural substances repel silverfish instantly. These are safe easy to use and surprisingly effective.

Essential oils

Silverfish hate strong scents like:

  • Lavender
  • Peppermint
  • Citrus
  • Cedar

Mix a few drops with water and spray around baseboards cracks and entry points.

Cedar

Cedar blocks or chips naturally repel insects. Place them in closets drawers and storage areas.

Cinnamon or cloves

Sprinkle in areas where silverfish appear. The strong smell acts as a natural deterrent.

Step 4: DIY Traps for Quick Results

If you want to reduce the population quickly traps are a great solution.

Glass jar trap

  • Wrap a glass jar with masking tape on the outside
  • Put a small piece of bread or sugar inside
  • Silverfish climb in but cannot escape the smooth interior

Newspaper trap

  • Roll up a damp newspaper
  • Leave it overnight in an infested area
  • Throw it away in the morning without unrolling

This method works because silverfish are attracted to moisture and paper.

Step 5: Use Natural Powders for Long-Term Control

Some natural powders kill silverfish without toxic chemicals.

Diatomaceous earth (food grade)

This is one of the most effective natural solutions. It works by damaging the insect’s outer layer and dehydrating it.

How to use:

  • Sprinkle lightly along baseboards cracks and hidden areas
  • Leave it for several days
  • Vacuum and reapply if needed

Borax (use with caution)

Borax is natural but should be used carefully especially around pets and children. It is effective when mixed with sugar as bait.

Step 6: Seal Entry Points

Silverfish often enter through tiny cracks and gaps.

Check and seal:

  • Cracks in walls and floors
  • Gaps around pipes
  • Spaces behind baseboards
  • Window and door frames

Use caulk or sealant to block these entry points and prevent reinfestation.

How to Prevent Silverfish from Coming Back

Getting rid of silverfish is one thing but keeping them away is just as important.

Follow these habits:

  • Keep humidity low year-round
  • Clean regularly especially hidden areas
  • Store paper and fabrics in dry conditions
  • Use natural repellents as a preventive measure

Consistency is key. Even small improvements in cleanliness and dryness can make your home unattractive to silverfish.

Common Mistakes to Avoid

  • Ignoring humidity issues
  • Using only sprays without removing food sources
  • Not treating hidden areas
  • Stopping treatment too early

Silverfish can survive in small numbers and quickly return if conditions stay favorable.

Getting rid of silverfish naturally is absolutely possible and often more effective than using chemicals. The combination of reducing moisture cleaning thoroughly using natural repellents and setting traps gives you fast results without risking your health.

Start with humidity control then add traps and repellents for the best outcome. Within days you should notice a significant reduction and within weeks your home can be completely silverfish-free.

If you want I can also turn this into a Pinterest-optimized article with SEO keywords headlines and pin descriptions for your strategy.

post

How to Keep Skunks Away From Your Yard

Skunks may look small and harmless but anyone who has ever smelled their defensive spray knows they can quickly become a serious problem around the house. These nocturnal animals are attracted to places where they can easily find food water and shelter. If your yard offers any of these things skunks may start visiting regularly. The good news is that there are several simple and humane ways to make your yard far less attractive to them.

Why Skunks Come Into Yards

Before trying to remove skunks it helps to understand why they come in the first place. Skunks are opportunistic animals which means they look for easy meals and safe hiding spots. Many yards accidentally provide exactly that.

Some of the most common reasons include

  • Pet food left outside
  • Open garbage bins
  • Fallen fruit from trees
  • Grubs and insects in the lawn
  • Wood piles or decks where they can hide
  • Accessible crawl spaces under sheds or porches

If a skunk finds food once it will often return again and again.

Remove Food Sources

The most effective step is eliminating anything that could be used as food. Skunks have an excellent sense of smell so even small leftovers can attract them.

Start by keeping trash cans tightly closed preferably with locking lids. If possible store them in a garage or shed overnight. Avoid leaving pet food outside especially during the evening when skunks become active.

If you have fruit trees pick up fallen fruit regularly. Compost piles should also be secured because the smell can attract wildlife.

Another common food source is lawn grubs. If your lawn has a lot of insects skunks may dig small holes while searching for them. Treating your lawn for grubs can significantly reduce this problem.

Secure Your Yard

Skunks often search for places to sleep during the day. If they find a sheltered spot they may stay nearby for weeks.

Check your yard for possible hiding areas such as

  • Spaces under decks
  • Gaps beneath sheds
  • Wood or brush piles
  • Open crawl spaces

Use fencing boards or wire mesh to block these areas. When sealing a space make sure no animal is currently inside. One simple trick is to loosely place soil or leaves at the entrance and check the next day to see if something has moved through.

Use Light and Motion

Skunks prefer dark quiet environments. Adding motion activated lights can make your yard feel unsafe for them.

Motion activated sprinklers are another effective tool. When the skunk enters the area the sudden spray of water will scare it away without causing harm.

Because skunks rely heavily on their sense of smell strong scents can also help deter them. Common natural repellents include

  • Citrus peels
  • Vinegar soaked cloths
  • Commercial skunk repellents
  • Predator urine products

These should be placed near areas where skunks usually enter the yard.

Protect Your Garden

If skunks are digging in your garden they are most likely looking for insects. Garden fencing can help especially if it extends slightly underground because skunks are capable diggers.

You can also place mesh or hardware cloth just beneath the soil surface in areas where digging happens frequently. Plants will grow through the mesh but animals will not be able to dig easily.

Keep Your Yard Clean

A tidy yard is far less attractive to wildlife. Regularly trim tall grass remove piles of leaves and keep storage areas organized.

Skunks prefer locations where they feel hidden and protected. Removing clutter makes your yard feel more open and exposed which encourages them to move somewhere else.

What Not To Do

It is important not to attempt aggressive removal methods. Skunks rarely attack unless they feel threatened and forcing them into a defensive situation often leads to the infamous spray.

Avoid trapping animals unless it is done legally and by professionals. In many areas relocating wildlife is restricted and improper handling can cause stress or injury to the animal.

When to Call Professionals

If a skunk has already made a den under your deck porch or shed professional wildlife control may be the safest option. Experts can remove the animal humanely and help secure the area so it does not return.

Final Thoughts

Keeping skunks away from your yard is mostly about removing the things that attract them. By eliminating food sources securing hiding places and using simple deterrents you can make your yard far less appealing to these animals.

With consistent maintenance most skunks will simply move on and look for easier places to live leaving your yard clean quiet and odor free.

post

10 Important Signs Your Body May Be Lacking Magnesium

Magnesium is one of the most essential minerals in the human body yet it is also one of the most commonly overlooked. It is involved in more than 300 biochemical reactions and plays a crucial role in energy production muscle and nerve function blood sugar control blood pressure regulation and bone development. Despite its importance many people do not meet the recommended daily intake especially those who consume highly processed foods or experience chronic stress.

Magnesium deficiency can develop gradually and the symptoms are often subtle in the early stages. Over time however low magnesium levels can begin to affect multiple systems in the body. Below are ten important signs that may indicate your body is not getting enough magnesium.

1. Frequent muscle cramps and spasms
One of the earliest and most common signs of magnesium deficiency is recurring muscle cramps especially in the legs. Magnesium helps regulate muscle contractions by balancing calcium levels inside muscle cells. Without enough magnesium muscles may contract involuntarily which can lead to painful cramps twitching or tightness. Nighttime leg cramps are particularly associated with low magnesium status.

2. Persistent fatigue and low energy
Magnesium is required for the production of ATP which is the primary energy molecule in your cells. When magnesium levels are insufficient the body cannot efficiently produce energy. This may result in constant tiredness low stamina reduced physical performance and a general feeling of weakness even if you are getting adequate sleep.

3. Increased anxiety and nervous tension
Magnesium plays a significant role in supporting the nervous system. It helps regulate neurotransmitters that influence mood and stress response. A deficiency may increase nervousness irritability and emotional sensitivity. Some individuals notice heightened anxiety or difficulty coping with everyday stress when magnesium intake is too low.

4. Difficulty falling or staying asleep
Healthy magnesium levels support relaxation by influencing neurotransmitters such as GABA which promotes calmness and sleep. When magnesium is low you may struggle to fall asleep experience restless sleep or wake up frequently during the night. Poor sleep can further worsen magnesium depletion creating a negative cycle.

5. Headaches and migraines
Research suggests that low magnesium levels may contribute to headaches and migraines in some individuals. Magnesium helps regulate blood vessel function and nerve signaling in the brain. Deficiency may increase susceptibility to tension headaches or more severe migraine attacks.

6. Irregular heartbeat or palpitations
Magnesium is essential for maintaining a steady and healthy heart rhythm. It helps regulate electrical signals that control the heartbeat. In more significant deficiencies some people may notice heart palpitations a fluttering sensation or irregular beats. Any persistent heart symptoms should always be evaluated by a medical professional.

7. Elevated blood pressure
Magnesium supports the relaxation of blood vessels which helps maintain healthy blood pressure levels. Insufficient magnesium intake has been associated with increased blood pressure in some individuals. Over time this may contribute to cardiovascular strain if not addressed.

8. Digestive issues or loss of appetite
Early magnesium deficiency may present with subtle digestive symptoms such as nausea mild abdominal discomfort or reduced appetite. Since magnesium also plays a role in muscle function including the muscles of the digestive tract low levels may affect bowel regularity.

9. Tingling numbness or abnormal sensations
Magnesium supports proper nerve transmission. When levels are too low some individuals may experience tingling sensations numbness or abnormal nerve responses particularly in the hands feet or face. These symptoms occur because magnesium helps regulate the movement of calcium and potassium in nerve cells.

10. Reduced bone strength over time
While calcium is often associated with bone health magnesium is equally important. It contributes to bone structure and influences vitamin D metabolism which is critical for calcium absorption. Chronic magnesium deficiency may negatively affect bone density and increase the risk of fractures especially in older adults.

Magnesium deficiency can result from inadequate dietary intake chronic stress gastrointestinal disorders type two diabetes certain medications such as diuretics or proton pump inhibitors and excessive alcohol consumption. Modern diets high in processed foods often lack sufficient magnesium compared to diets rich in whole foods.

Good dietary sources of magnesium include leafy green vegetables almonds pumpkin seeds cashews whole grains legumes avocados and dark chocolate. Maintaining a balanced diet that emphasizes minimally processed foods is the most effective way to support healthy magnesium levels.

If you suspect you may have a deficiency it is important to consult a healthcare professional before beginning supplementation. A proper evaluation can help determine whether magnesium is truly low and guide safe and appropriate treatment. Supporting your magnesium intake through diet and lifestyle choices can have a significant positive impact on overall health energy and long term wellbeing.

magnesium-deficient

post

How to Get White Clothes White Again 9 Easy Tricks That Actually Work

White clothes look fresh clean and timeless but they rarely stay that way for long. Over time white fabric can turn grey yellow or simply dull even when it is washed regularly. Sweat residue detergent buildup hard water and incorrect washing habits all slowly affect the fibers and steal their brightness.

Many people immediately reach for chlorine bleach but that often causes more harm than good. Bleach can weaken fabric create yellow tones and shorten the life of your clothes. The good news is that there are gentler and more effective ways to restore white clothes using simple household ingredients and better laundry habits.

Below you will find practical methods that actually work and can be used safely again and again.

1 Baking Soda Boost

Baking soda helps break down residue trapped in fabric and refreshes fibers.

How to use it
Add half a cup of baking soda directly into the washing machine along with your regular detergent. Wash white clothes as usual.

This method works best for everyday whitening and helps keep whites from turning grey over time.

2 White Vinegar for Yellowing

White vinegar removes detergent buildup and neutralizes odors that cause yellow stains.

How to use it
Add one cup of white vinegar to the rinse cycle or soak white clothes in warm water mixed with vinegar for about one hour before washing.

This is especially effective for underarm stains towels and shirts worn close to the skin.

3 Lemon and Sunlight Method

Lemon juice combined with sunlight creates a natural whitening effect.

How to use it
Slice two lemons and boil them in water. Pour the mixture into a large container add warm water and soak white clothes for one to two hours. Wash as usual and let the clothes dry in direct sunlight if possible.

Sunlight gently bleaches fabric and enhances the whitening power of lemon without damaging fibers.

4 Hydrogen Peroxide Whitening Soak

Hydrogen peroxide is a safe bleach alternative for white fabrics.

How to use it
Mix one cup of hydrogen peroxide with warm water and soak clothes for 30 to 60 minutes before washing.

This method works well for heavily dulled whites and old stains that do not respond to regular washing.

5 Oxygen Bleach for Deep Cleaning

Oxygen bleach brightens whites without weakening the fabric.

How to use it
Follow the instructions on the package and soak white clothes before washing.

This option is ideal for bed sheets towels socks and thicker fabrics.

6 Dish Soap for Grease and Body Oils

Grease and body oils can make white clothes appear grey even after washing.

How to use it
Apply a few drops of clear dish soap directly onto the stain gently rub it in and let it sit for 10 to 15 minutes before washing.

This is particularly useful for collars cuffs and kitchen stains.

7 Avoid Overloading the Washing Machine

Overcrowding prevents proper rinsing and leaves residue behind.

Tip
Wash white clothes in smaller loads to allow water detergent and movement to clean fabrics thoroughly.

8 Choose the Right Water Temperature

Water temperature plays a big role in whitening results.

Tip
Use hot water only for cotton and durable fabrics. For delicate materials warm water is usually safer. Always check the care label before washing.

9 Always Wash Whites Separately

Even light colored clothes can release dye over time.

Tip
Wash whites separately from beige grey pastel and light colored items to prevent gradual discoloration.

Common Mistakes That Make White Clothes Look Worse

Using too much detergent which causes buildup
Relying on fabric softener that coats fibers
Letting stains sit too long before washing
Drying stained clothes which sets the marks permanently

How to Keep White Clothes White Longer

Wash whites regularly instead of waiting until they look dirty
Treat stains as soon as possible
Avoid excessive heat in both washing and drying
Store white clothes in a dry clean space away from direct sunlight

White clothes do not have to fade into disappointment. With the right habits and a few simple ingredients your favorite white shirts towels and sheets can stay bright fresh and wearable for much longer.

post

Embrace the Snow-Time Magic of Winter: 5 Ways to Turn Cold Days into Cozy Memories

As the temperature drops and snowflakes begin to fall it’s time to lean into the magic of winter. Whether you’re relaxing in a cabin or sipping something warm by the window this season invites you to slow down and create memories that shine like fresh snow. Here are five simple ways to turn cold days into cozy share-worthy moments.

1. Create a Hot Drink Ritual
There’s something special about holding a warm mug while the world outside freezes. On Pinterest searches for hot apple cider recipes are rising fast.
Set up a mini drink station with cinnamon sticks whipped cream and marshmallows. Take a cozy photo for your feed and invite friends to join in. For a creative twist try a winter bubble tea version like “Snowflake Pearls and Warm Spice.”

2. Bring the Cozy Cabin Vibe Home
After outdoor fun nothing feels better than coming inside to a warm and soft space. Pinterest users love cozy earthy rooms chunky blankets and glowing lights.
Layer textures like knits faux fur and natural wood. Light a few candles and let the soft glow fill the room. A close-up photo of a blanket a mug and gentle light is perfect for Pinterest.

3. Make Outdoor Moments Mini Adventures
Winter doesn’t mean you have to stay inside. Go sledding build a snowman or take a short winter walk. People are searching for winter bucket list ideas and small adventures make great memories.
Capture the joy of rosy cheeks a dog jumping through snow or the golden glow of sunset on a frozen field. These photos tell warm stories that people love to save.

4. Use Food and Drinks as Comfort Creators
Comfort food and warm drinks make winter special. Pinterest users love ideas for chili stews and hot cocoa bars.
Try a unique version of your own. For example create a bubble tea winter edition with ginger syrup and vanilla pearls. Add steam and frosted glass for that cozy winter look that everyone loves to pin.

5. Share the Why This Season Matters Story
People love saving pins that carry emotion and meaning. Focus on the reason behind the moment. Building a snow fort brings back childhood wonder. A hot drink ritual brings calm when life slows down.
Share not just what you do but why you do it. That feeling is what makes your content go viral.

Final Thought
Winter is a gift of contrast. The cold outside makes the warmth inside feel richer. The quiet snow invites reflection and shorter days remind us to slow down. Use this season to build visuals moments and stories that people want to save because they feel cozy inspiring and real.

post

How to Get Rid of Termites at Home Naturally

Termites are small but incredibly destructive insects that can cause major damage to your home. They feed on wood and other materials that contain cellulose, silently weakening furniture, floors, and even the structural framework of a house. Many people turn to chemical pesticides to solve the problem, but these can be harmful to humans, pets, and the environment. The good news is that you can fight termites naturally with safe, eco-friendly methods that really work.

Here are seven proven natural ways to get rid of termites and prevent them from coming back.

1. Use Orange Oil

Orange oil is one of the most effective natural termite repellents. It contains d-limonene, a compound that kills termites on contact by breaking down their exoskeleton.

How to use: Apply orange oil directly to infested wood using a spray bottle or a cotton ball. Focus on cracks, holes, or areas where you see termite activity. For small infestations, this can be a quick and powerful solution. Reapply every few days until the problem disappears.

2. Expose Termites to Sunlight

Termites thrive in dark and humid places. Sunlight and heat are natural enemies of these pests.

How to use: If you notice termites in wooden furniture or small wooden items, place them outside in direct sunlight for several hours. The heat will dry out the termites and kill them naturally. You can also improve ventilation indoors by opening windows and reducing moisture levels.

3. Try Cardboard Traps

A simple and inexpensive way to catch termites is to use wet cardboard traps. Termites are attracted to the cellulose in cardboard, which makes it an ideal bait.

How to use: Take a few sheets of cardboard, wet them, and place them near termite-infested areas. After termites gather on the cardboard, remove it carefully and burn or dispose of it immediately. Repeat this process until you see fewer termites.

4. Sprinkle Diatomaceous Earth

Diatomaceous Earth, also known as DE, is a natural powder made from fossilized algae. It’s completely safe for people and pets but deadly to termites.

How to use: Sprinkle DE around cracks, baseboards, and areas where termites may enter. When termites come into contact with it, the powder damages their outer layer, leading to dehydration and death. Reapply after rain or cleaning.

5. Release Beneficial Nematodes

Beneficial nematodes are microscopic worms that feed on termite larvae and other soil-dwelling pests. They are harmless to humans, animals, and plants but very effective against termites.

How to use: You can buy nematodes online or from garden supply stores. Mix them with water and spray them into the soil or around wooden foundations. They will naturally seek out and eliminate termite colonies.

6. Maintain a Dry Environment

Moisture attracts termites more than anything else. Keeping your home dry and well-ventilated is one of the easiest ways to prevent infestations.

Tips: Fix leaky pipes and roof issues as soon as possible. Avoid keeping piles of firewood or mulch close to your walls. Use a dehumidifier in basements or other damp areas to keep humidity low.

7. Apply Vinegar and Lemon Juice

A mixture of vinegar and lemon juice can also help repel termites naturally. The acidity of the solution destroys the soft bodies of termites and acts as a mild disinfectant.

How to use: Mix equal parts white vinegar and fresh lemon juice, pour the solution into a spray bottle, and apply it to infested areas. Repeat daily for a week to get visible results.

Getting rid of termites naturally takes patience, but it’s possible with consistent effort and the right methods. Using orange oil, diatomaceous earth, sunlight, and nematodes can significantly reduce termite activity without resorting to toxic chemicals. For large infestations or structural damage, it’s always smart to consult a professional pest control service.

By combining natural remedies with proper maintenance and prevention, you can keep your home safe, healthy, and termite-free for years to come.